avatar

ROOT CA signed Certificate

September 15, 2021 in Web Server

How it works:

There are many CA (Certificate Authorities) around the world that they can generate a certificate for you once you provide the required information and identify that you are the owner of the domain or subdomain where you are planning to use the certificate. Most of them are providing this service for an amount money but there are also free solutions. This is something that you need to do if you want to host a service like a web site and you want that everything that is transmitted from any client to your server and vice versa will be encrypted. In the other hand the clients also need to be sure that they can access your server in a secure way. And since they are not able to check your certificate we are relying to a CA to do the job. But if you need to protect an internal website that is running inside your company, then you can become a local CA. Here is how


Became a local CA

issue the following command in order to create a new key that we will use later for our CA certificate.

openssl genrsa -aes256 -out CA.key 4096

You should provide a password twice and the key is ready to use.
The output should look like this:

Generating RSA private key, 4096 bit long modulus (2 primes)
…………………………………………………………………………………..++++
…………………………………………………………………………………………….++++
e is 65537 (0x010001)
Enter pass phrase for CA.key:
Verifying -- Enter pass phrase for CA.key:

Now you have a file that is called CA.key and the contents should be like that:

—--BEGIN RSA PRIVATE KEY—--
Proc-Type: 4,ENCRYPTED
DEK-Info: AES-256-CBC,438387DEFA5FD5275315FD562F1BC0D8

GXs5bW36Ifl0PvP4VYKktVLyxzpHNTkjh+dxMCfQRp9RfKBZl6rjVqYd2hovC01o
DzqIzeVMkT7GWUw3zYUulIYqXDRALTwNa8X5cEF2qtxFQCmMNpK1uHSl761Agtqm
—many lines have been removed—
3vOqEUBD7CNFeS4lkGG4xrsZBdALEFRyPPbzpnIrDwY+jvoLDVSFy7jXncgwFEem
jiUwxpBySCKAP8oMPISlTwh+K9lJ0JgMN1TahCMkdYB8GcTud5+wR8hvl4Wc7gzM
—--END RSA PRIVATE KEY—--

Create a CA Certificate:

Now we need to create a certificate that we are going to install on all systems in our company that they will use the certificates that we are going to create with this CA certificate. So this is a root certificate that a computer is using to identify all certificates that are issued from our CA. Now you need to issue the following command and provide the password from the key we created in the previous step and answer the questions. 

openssl req -x509 -new -nodes -key CA.key -sha512 -days 365 -out CA.pem
Enter pass phrase for CA.key:
You are about to be asked to enter information that will be incorporated
into your certificate request.
What you are about to enter is what is called a Distinguished Name or a DN.
There are quite a few fields but you can leave some blank
For some fields there will be a default value,
If you enter ‘.’, the field will be left blank.
—--
Country Name (2 letter code) [AU]:GR
State or Province Name (full name) [Some-State]:-
Locality Name (eg, city) []:Athens
Organization Name (eg, company) [Internet Widgits Pty Ltd]:MyCompanyName
Organizational Unit Name (eg, section) []:IT
Common Name (e.g. server FQDN or YOUR name) []:MyCompanyName.local
Email Address []:info@MyCompanyName.local

Create an SSL certificate using our CA

Now as before we will need to create another key so we can generate a CSR file with all info about our domain and then we will use this file to issue a certificate.

Create the Key:

openssl genrsa -out allaboutlinux.local.key 4096

Create the CSR file:

openssl req -new -key allaboutlinux.local.key -out allaboutlinux.local.csr
You are about to be asked to enter information that will be incorporated
into your certificate request.
What you are about to enter is what is called a Distinguished Name or a DN.
There are quite a few fields but you can leave some blank
For some fields there will be a default value,
If you enter ‘.’, the field will be left blank.
—--
Country Name (2 letter code) [AU]:GR
State or Province Name (full name) [Some-State]:-
Locality Name (eg, city) []:Athens
Organization Name (eg, company) [Internet Widgits Pty Ltd]:MyCompanyName
Organizational Unit Name (eg, section) []:IT
Common Name (e.g. server FQDN or YOUR name) []:allaboutlinux.local
Email Address []:info@allaboutlinux.local

Please enter the following ‘extra’ attributes
to be sent with your certificate request
A challenge password []:MySecurePassword!
An optional company name []:

Create the certificate from CSR signed by the CA:

openssl x509 -req -in allaboutlinux.local.csr -CA CA.pem -CAkey CA.key -CAcreateserial -out allaboutlinux.local.crt -days 100 -sha512

Now you can use this certificate on the server side and as long as the clients already have the CA certificate they will be able to identify this certificate and any other that we will create in the future by using the same CA.

avatar

install Netbeans PHP IDE in Ubuntu

September 16, 2017 in Web Server

install Netbeans in Ubuntu.

Installing required software.

Before we install Netbeans we need to install Apache2 and Php.

sudo apt-get update
sudo apt-get install apache2 php

Now lets install Netbeans

sudo apt-get install netbeans

Now we need to add the php support for Netbeans. go and download that from the official website https://netbeans.org/downloads/index.html

Once the download completes then do to Downloads directory make the file executable and run it.

cd ~/Downloads/
sudo chmod +x netbeans-8.2-php-linux-x64.sh
./netbeans-8.2-php-linux-x64.sh

Then follow the wizard and install it.

This script will update the Netbeans and add php components into the IDE.

before we create a new project we need to add write permissions in the Apache root directory so netbeans will  be able to write directly into this directory.

sudo chmod 777 /var/www/html/

Lets create a new project.

Open Netbeans from Ubuntu Menu and click on "File" and then "New Project"

Select "PHP" --> "PHP Application" and click "Next"

Then change the project name and click next.


On the next window click the check box "copy files from Sources Folder to another location" and add the "html" after "/var/www/"


Now click finish and lets create a small php project where we will try to authenticate a user.

in the index.php just delete everything and copy the following:

<?php
   ob_start();
   session_start();
?>
<html lang = "en">
   
   <head>
      <title>allaboutlinux.eu</title>
      <link href = "css/bootstrap.min.css" rel = "stylesheet">
    
      
   </head>
	
   <body>
      
      <h2>Enter Username and Password</h2> 
      <div class = "container form-signin">
         
         <?php
            $msg = '';
            
            if (isset($_POST['login']) && !empty($_POST['username']) 
               && !empty($_POST['password'])) {
				
               if ($_POST['username'] == 'allaboutlinux.eu' && 
                  $_POST['password'] == 'aal.eu') {
                  $_SESSION['valid'] = true;
                  $_SESSION['timeout'] = time();
                  $_SESSION['username'] = 'allaboutlinux.eu';
                  
                  echo 'You have entered valid use name and password';
                  header("Location: http://localhost/allaboutlinuxeu/correct_password.php");
               }else {
                  $msg = 'Wrong username or password';
               }
            }
         ?>
      </div> <!-- /container -->
      
      <div class = "container">
      
         <form class = "form-signin" role = "form" 
            action = "<?php echo htmlspecialchars($_SERVER['PHP_SELF']); 
            ?>" method = "post">
            <h4 class = "form-signin-heading"><?php echo $msg; ?></h4>
            <input type = "text" class = "form-control" 
               name = "username" placeholder = "username" 
               required autofocus></br>
            <input type = "password" class = "form-control"
               name = "password" placeholder = "password" required>
            <button class = "btn btn-lg btn-primary btn-block" type = "submit" 
               name = "login">Login</button>
         </form>


      </div> 
      
   </body>
</html>

Then lets adds one more php file that will just say "Login succesfull" if you provide the right username and password.

Right click on "Source files" --> "New" --> "PHP File…" and give the filename that we added in the index.php as redirected page. In this case "correct_password.php". Delete everything and paste the following:

<!DOCTYPE html>
<!--
To change this license header, choose License Headers in Project Properties.
To change this template file, choose Tools | Templates
and open the template in the editor.
-->
<html>
    <head>
        <meta charset="UTF-8">
        <title></title>
    </head>
    <body>
        <?php
        // put your code here
        echo("Login succesfull");
        ?>
    </body>
</html>

Now click on "Run" --> "Rub Project" or hit "F6″. If everything was right then you should see a login page and if you give as username "allaboutlinux.eu" and password "aal.eu" you will get redirected into the correct_password page.

Have fun! Create your own pages and post your results here.

avatar

Chrome in Ubuntu

September 16, 2017 in software

Install Google Chrome in Ubuntu 17.04

chromeGo to official website of Google Chrome and click on the "Download now" button.
Select the "64 bit .deb (For Debian/Ubuntu)", read the agreement and if you agree click on "Accept and Install" to download the installation package. Save the file to the default location ~/Downloads/.
the filename should look like that: "google-chrome-stable_current_amd64.deb"
after that open a terminal go to Downloads directory and try to install the package.

cd ~/Downloads/

sudo dpkg -i google-chrome-stable_current_amd64.deb

if you get an error like: "dpkg: dependency problems prevent configuration of google-chrome-stable:" it is because some dependancies are missing. To fix that enter the following command:

sudo apt-get -f install

Then you should be able to run Chrome. To run Google Chrome type in terminal "google-chrome" or click the icon in the menu.


avatar

The Linux Terminal

September 14, 2017 in shell (Command line)

Introduction To Linux Terminal


1.1.The magic of Linux Terminal.


The Linux shell exists since Linux invented and it is still one of the most powerful ways for a user to interact with a system. There are thousands of different Linux distributions out there but if you look all of them from the command line perspective you will find out that all of them are almost the same. The Linux Terminal is fast, light, fully customizable, can be accessed remotely and so much more.

For most of the user at the beginning Linux terminal is just a black window that seems a bit unfriendly but after you get used to it you will love it.


I use Ubuntu on all my examples presented here but the magic of Linux Terminal is that you can use your favorite Linux distribution and still be able to follow.

There are several terminal instances running at the same time in Linux O.S. and most of the times you can access them by using key combinations. In Ubuntu you can use ctrl+alt+F1 to access the first command line instance ctrl+alt+F2 for the second and so on until the 6th. with ctrl+alt+F7 you can access the Graphic User Interface. From there you can open as many terminal emulators as you wish. those terminals can be started from the menu of the O.S. or in Ubuntu you can use ctrl+alt+t.


At that point i assume that you already have a running system and that you are able to open a terminal. If not then now it’s a good time to install a Linux system. You can either use a physical machine or a virtual.


But let’s get started!

1.2.Who am I? Where am I? what time is it???


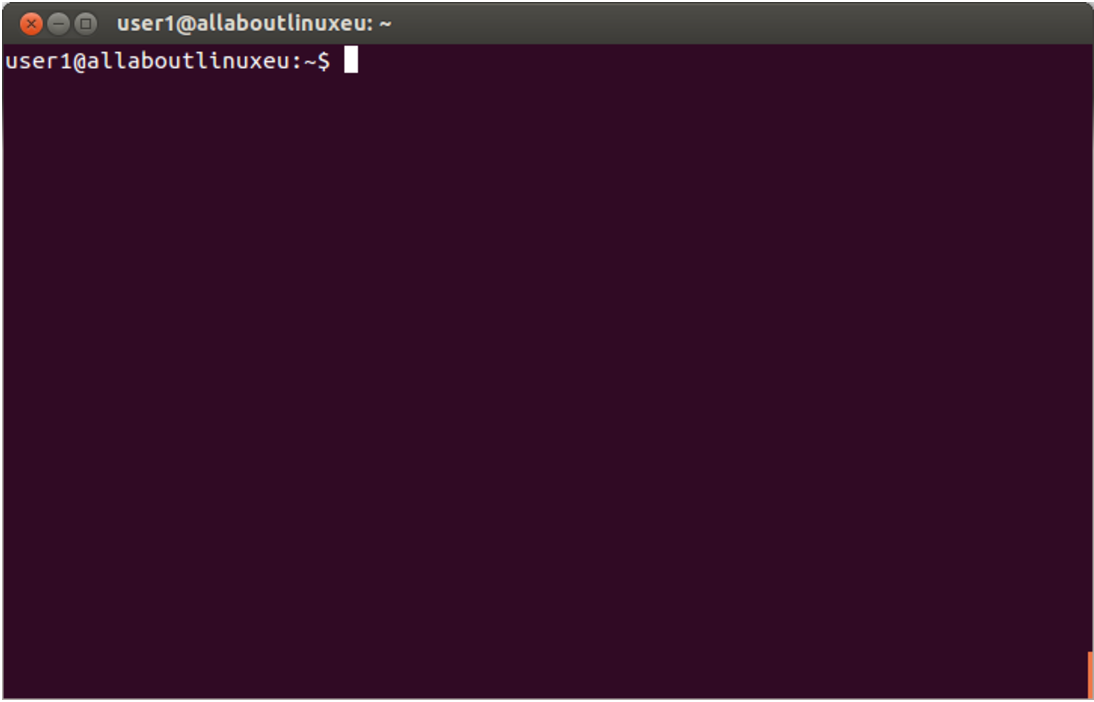
A Linux terminal emulator in Ubuntu is look like the image 1.1. Even without giving any commands you are still able to get some information out of this.

Image 1.1

This is what you get


user1@allaboutlinuxeu:~$


user1: is the user-name of the current user

@: the at sign between user-name and computer-name

allaboutlinuxeu: is the computer-name or host-name

So altogether it says that user1 is connected to allaboutlinuxeu

the “:” indicates that the disk path is starting here.

the “~” indicates that I am currently in my home directory

the “$” indicates that I am logged in as normal user (if i logged in as root this symbol will change to “#”)

Note! This string user1@allaboutlinuxeu:~$ is not standard. Other Linux distribution might give less or more info. You can also customize that to fit your need but we will check that on a next chapter.

Let’s start with first question: Who am I?

At that point i want to mention that all text with gray background are commands or outputs from a terminal.

So now just type “whoami”


user1@allaboutlinuxeu:~$ whoami
user1
user1@allaboutlinuxeu:~$


After “$” you can type the command “whoami” and in the next line is coming the output of that command and then the Shell is going back to idle and it is just waiting for the next command. So I have successfully verify that I am “user1”.


But where am I? go ahead and type “pwd”


user1@allaboutlinuxeu:~$ pwd
/home/user1
user1@allaboutlinuxeu:~$


pwd stands for: Print current/Working Directory. I will not go deep into the file structure on a Linux machine right now but I will explain that later. for now, I know that “I am at /home/user1”.


And what about time, date, year? for that just type “date”


user1@allaboutlinuxeu:~$ date
Tue Jul 11 23:18:09 UTC 2017
user1@allaboutlinuxeu:~$


This output is pretty much self explained so i will not go any farther with that.


At any point you want to quit a terminal then you just need to type “exit”.

1.2.What is a Linux command?

A Linux command can be a single word following by some parameters some files or Directories or even some variable and inputs from user. We already went through some basic single word commands like whoami, pwd and date. But how can the O.S. understands what to do?

Most of the commands are actually small binaries (small programs) that was installed in your computer during the O.S. installation process. The binary whoami for example is in the directory /usr/bin . Normally in order to execute that binary you need to provide the full path. In that case /usr/bin/whoami . Try that:


user1@allaboutlinuxeu:~$ /usr/bin/whoami
user1
user1@allaboutlinuxeu:~$


As you can see the output is exactly the same since in both cases the same binary executed.

But how the system knows where to look for those binaries?


There are a few directories that contain binaries and and the O.S. is searching in those to check if a command provided in the terminal has a binary in those directories. If you want to see the list of those directories type the following command:


user1@allaboutlinuxeu:~$ echo $PATH
/usr/local/sbin:/usr/local/bin:/usr/sbin:/usr/bin:/sbin:/bin:/usr/games:/usr/local/games
user1@allaboutlinuxeu:~$


This is the full list of directories that the O.S. is looking for binaries for the current user.

Tip: The $PATH can also be modified to include or exclude some paths.

Since the /usr/bin is in that list the O.S. is executing binaries within that directory even without the /usr/bin so in that case only the command whoami is enough. This might be a bit confusing right now but it will be more clear later on.

1.3 The Main Linux Directories.


Linux have a hierarchical directory structure like the most Operating Systems. This system is a like a tree and it has a root directory that includes everything then there are some directories and files under that:

/
├── bin
├── boot
├── cdrom
├── dev
├── etc
├── home
├── lib
├── lib64
├── lost+found
├── media
├── mnt
├── opt
├── proc
├── root
├── run
├── sbin
├── srv
├── sys
├── tmp
├── usr
└── var
   ├── backups
   ├── cache
   ├── crash
   ├── lib
   ├── local
   ├── lock -> /run/lock
   ├── log
   ├── mail
   ├── metrics
   ├── opt
   ├── run -> /run
   ├── spool
   └── tmp


In that example i have only expanded the subdirectories in /var and only in 1 level. There are  many more subdirectories but the list wouldn’t easily fit here.


Let’s take a brief look on the main directories in Ubuntu.

/bin this is the first in the list and contains binaries that system needs to boot but many of those are also usable by users like the date command we used before.

/boot that is maybe the most important directory in a linux system. it contains the kernel (this is the heart of a linux O.S.) and important information for booting the system.

/dev here is a list of devices that the O.S. can access like hard drives partitions cd roms serial ports etc.

/etc one of the core directories of the system since it contains all the configurations of the system, scripts that are running during the boot usernames groups almost everything you can imagine that can be configured in a system.

/home this contains the home directories for each user and users can store their files and directories here.

/lib this is the library directory that is used by programs

/lost+found In case of an abnormal shutdown or if something is going wrong into your file system the O.S. will try to recover files  and place them into that directory. Generally if this directory is empty is a good sign!

/media USB disks, USB sticks, CD-ROMS and other removable devices are mounted inside that directory. (that is not true for all Linux O.S.)

/mnt Generally that directory is empty but this is good place if you want to manually add shared/network directory or manually mount a device

/opt that is also kinda new in Linux and it is used to hold “optional Software” software that users install or anything that is not part of the main O.S. in the past that directory was under /usr/local and some programs are still prefer that directory.

/proc that is an interesting Directory since it hold files that used mainly by the system to identify hardware parts but in most cases those files are human readable and you can get some interesting information out of that.

/root that is the home directory for user root. This is a special user that have permissions to do anything in a Linux machine

/sbin this one is like /bin and hold some binaries that can be executed by root or any super user.

/tmp A temporary directory that programs are storing temporary info while programs executed in your system.

/usr This folder contains most of the binaries used by users and sometimes by system. There are many interesting subdirectories in this one.

/var That directory holds dynamically changed files like log files, databases and generally is the most active directory in the system.

1.4 Navigate into Linux File system.


the main command to jump from one directory to another is the “cd” and this one stands for “Change Directory”.  Let’s navigate to the root. This is the main directory that holds all others and it is represented by the “/” slash symbol.


user1@allaboutlinuxeu:~$ cd /
user1@allaboutlinuxeu:/$


As you can see the “~” tilde symbol that represents the home directory of the user changed to “/”

Tip: at anytime if you want to check the path to the current working directory you can issue the “pwd” command.


Now that we are at the root of our file system we can navigate to any directory that we have permissions to read. We will talk about permissions in a later chapter. let’s go to “usr” directory and from there inside the “games” directory. This can be done step by step like:


user1@allaboutlinux:/$ cd usr
user1@allaboutlinux:/usr$ cd games
user1@allaboutlinux:/usr/games$

or with one command like:


user1@allaboutlinux:/$ cd usr/games
user1@allaboutlinux:/usr/games$


You may have already noticed that the directories are separated by “/” and also the command prompt string changed from “user1@allaboutlinux:/$” to “user1@allaboutlinux:/usr/games$” in that way you can always check the current working directory that starts after the “:”

In order to move back one directory then we can use the command “cd ..”:


user1@allaboutlinux:/usr/games$ cd ..
user1@allaboutlinux:/usr$


The “..” two dots are standing for the parent directory while the “.” one dot stands for the current directory there is no point to change to current directory but that is important on some other occasions.


1.4.1 Absolute path vs Relative path.


The absolute path.

Every directory or file in our file system have its own unique path. This address starts from “/” and ends at the directory or the file that we want to reach. For example if we want to play gnome-sudoku we need to know the path to that game.

Note! Ubuntu and some other debian based Linux are coming with that game. This may not be available in other Linux distributions.

The absolute path for that game is /usr/games/gnome-sudoku

As you can see that path starts with “/” following by some subdirectories and ends at the filename. Some other O.S. used to have an extension to every file and with that the file is identified. In Linux, extensions are not mandatory. So now if i want to play that game all i have to do is to provide the absolute path to that game and i can do that from any location. It doesn’t matter if i am in /var or in /home/user1. Since i am providing the absolute path the system will just go there and execute the file. that is the meaning of the absolute path.

let’s have some fun:

user1@allaboutlinux:/usr$ /usr/games/gnome-sudoku
user1@allaboutlinux:/usr$


At that point a new window will open and sudoku will run. Once you close the window the command line will become again available.


Relative path.

There is also another way to navigate through file system by providing the relative path. instead of starting from “/” you can start from any other location and that path will be relative to your current working directory. Right now you are at “/usr” and if you want to start again the same game that is in a subdirectory of usr then you need to provide the relative path from “/usr” to the executable. as we said before the “.” one dot stands for the current directory. So if i am in “/usr” and type “.” then in essence I am saying /usr/ and from there i can continue like “./games/gnome-sudoku” or if i was already inside the games directory (so my current working directory was /usr/games/) then i would be able to execute the same game by typing ./gnome-sudoku


It might sound a bit complicated at that point but we will see many examples of that later on and it will become much more clear. But for now just remember that when i’m providing the full path starting from root “/” to the file or directory i’m using the absolute path and when I am providing a path related to my current working directory I am using a Relative path. There is no right and wrong way to do something we just use whatever is more convenient.


1.5 List the contents of a directory “ls”


Let’s list the contents in the root directory. For that you will need the ls command.

ls stands for “list”


user1@allaboutlinuxeu:/$ ls
bin    dev   initrd.img      lib64       mnt   root  srv  usr      vmlinuz.old
boot   etc   initrd.img.old  lost+found  opt   run   sys  var
cdrom  home  lib             media       proc  sbin  tmp
user1@allaboutlinuxeu:/$


Those 2 commands are the most basic in order to navigate to a directory  and list all the files in that directory. if we want for example to check the contents of /usr then we can first go inside /usr and then list the contents.


user1@allaboutlinux:/$ cd usr
user1@allaboutlinux:/usr$ ls
bin  games  include  lib  local  locale  sbin  share  src
user1@allaboutlinux:/usr$


“ls” by default is listing the contents of the current working directory but you can also provide the path of the directory that you want to list the contents and run the command from everywhere without going directly into the specific directory. In the same scenario where I am in root directory “/” and i was to check the contents of /usr instead of moving in i run directly the “ls” command and providing the absolute path of the directory.


user1@allaboutlinux:/$ ls /usr/
bin  games  include  lib  local  locale  sbin  share  src
user1@allaboutlinux:/$

In this directory you can see the full list of files and directories that you have in your Linux but as a normal user you do not have access to all of them. Every user have his own directory where he/she have full control to read write and execute. Now its time to go back to owr home directory and create a subdirectory and a file inside that directory. there are many ways to do that but the easiest is by typing “cd ~/” that is equal to “cd /home/user1” where user1 is the name of current user.


method 1:

user1@allaboutlinux:/$ cd ~/
user1@allaboutlinux:~$


method 2:

user1@allaboutlinux:/$ cd /home/user1/
user1@allaboutlinux:~$


1.6 Creating and deleting files and directories

Now we are in our Home directory. With the following command we can create a directory named “working_directory”


user1@allaboutlinux:~$ mkdir working_directory
user1@allaboutlinux:~$

Tip: By default this command will not return any output. in case that there is a problem during creating the directory an output will be generated and you will be able to check what went wrong. A common issue is when you are trying to create a sub-directory inside a directory that you don’t have write permission. We will talk about permissions in a next chapter.


Note you should not use “space” in files or directories names. the command “mkdir working directory” will actually create 2 directories one named “working” and one named “directory”


ok now that we have a test directory we can go in and create a file with name test_file. again here I am using an underscore otherwise the system will generate 2 file one named test and one named file. the command to create an empty file is the "touch". so lets do that.


user1@allaboutlinuxeu:~$ cd working_directory/
user1@allaboutlinuxeu:~/working_directory$ touch test_file
user1@allaboutlinuxeu:~/working_directory$


now lets list the contents of this directory


user1@allaboutlinuxeu:~/working_directory$ ls
test_file

Great so we have our first file inside our first directory. Now lets move on and delete this file. The command that we need to use is the "rm" which stands for remove and it can be used for both files and directories. lets delete the file by issuing the "rm" followed by the file name and list the contents of directory to make sure that the file is deleted.


user1@allaboutlinuxeu:~/working_directory$ rm test_file 
user1@allaboutlinuxeu:~/working_directory$ ls
user1@allaboutlinuxeu:~/working_directory$


Note Linux will never ask by default for a confirmation when you are deleting a file and will not produce any output if the operation was successful. It will always assume that you know what are you doing. You also need to have in mind that the file is not going into a trash can or anything similar. So you should say good-bye to your file for good.


Now lets try to remove the directory that we created before. We will need to navigate to the parent directory and then issue the rm command again followed by the directory name. But since this is a directory we need to use the option "-d". The -d is saying to rm to remove an empty directory. so lets do that.

user1@allaboutlinuxeu:~/working_directory$ cd ..
user1@allaboutlinuxeu:~$ rm -d working_directory/
user1@allaboutlinuxeu:~$


now we need to mention 2 more parameters for the rm command is the -r that stands for Recursive and the -f that stands for Force.

if you combine those 2 together then you can remove a directory and its contents no matter how many sub directories and files are listed inside.

So the command will look like the following.

user1@allaboutlinuxeu:~$ rm -rf working_directory/


1.7. Users and Groups

In a Linux system you can create as many users as you need. Those users can be local or network users if you are running a NIS authentication. For now we will talk about local users.

Each user in  a Linux system has its own Directory where he/she has full permissions and as we already said the short path symbol for that is the "~"

so in order to navigate into this directory all you have to do is to issue the following command:

user1@allaboutlinuxeu:/$ cd ~

In there users can store their personal files and also change the configuration files so they can customize their terminals. those files are not visible by default since they are hidden. but you can see them if you type the "ls" command following by the -a parameter.

user1@allaboutlinuxeu:~$ ls -a
. .cache Downloads Music Videos
.. .config examples.desktop Pictures .Xauthority
.bash_history Desktop .gconf .profile .xsession-errors
.bash_logout .dmrc .ICEauthority Public
.bashrc Documents .local Templates

The names of all hidden files and directories starts with a ".". lets check a few of the most interesting files.

.bash_history

in this file the system stores all the commands that you are typing in a terminal and this is a great source to check what you have done so far. this is a plain text file and you can check the contents of it by using the "cat" command.

user1@allaboutlinuxeu:~$ cat .bash_history 
ls ~
cd ~
ll
ls ~
ls -a ~
ls -a

Another way to check your history is by simply issuing the "history" command that will give the same results.

.bash_logout

This is a script that is running when a user is logging off from his/her account and by default it is clearing the screen to increase privacy. This files can be adjusted so you can perform some extra actions upon log off. One of my favorites is to back up some important directories to a share drive. We will talk about modifing those files in another chapter.

.profile

This is one is executed once the user is logging in and its a great place to define config files for your account. In Ubuntu for example it defines the basic account config file and the $PATH that we talked already in a previous Chapter.

And last but not least is the .bashrc file. This is maybe the most important config file for your account and we will spend a lot of time on that later on.


The usergroups in a Linux system are logical combinations of users. Users can be part of many groups. Basically this is a great way to categorize users and provide them permissions on specific directories or files. 


At the end we need to say a few words about "root" user. This user exists on all Linux machines and it is a special user that have permissions to access and modify everything in the system. You should avoid using this user for everyday work but when everything collapse then you know that you can count on this user. Normally in a production environment only the Linux administrators have access to this account. 


1.8 Permissions on Files and Directories 


To be continue…

Stay tuned 😉


avatar

iSCSI server with OpenSuse

August 7, 2017 in Web Server

iSCSI server with OpenSuse.


In this tutorial i will try to demonstrate how you can create an iSCSI target and then mount it on another machine.

For that i will use the latest available OpenSuse at this time which is the Leap 42.3. I guess that this can be followed by other versions also.

login to OpenSuse, open a terminal and type:

sudo zypper update
sudo zypper install yast2-iscsi-lio-server


Once this is over then you need to open yast and then find and open the "iSCSI LIO Target".

On the first tab "Service" under the section:

"Service start"

Choose if you want the server to run automatically on startup of O.S. or manually.

"Firewall settings for SuSEfirewall2″

click the checkbox "Open port Firewall" if you want to let the system do it for you, otherwise you can also do that manually later on.


After that click on the next tab "Global" and the Discovery credentials. You can let that free by clicking the "No discovery Authentication’ 


On the last tab "Targets" we are going to define the Targets, but before we do so we need to prepare the partition. On this example i use  a secondary disk that it is attached to the computer as raw and has nothing on it. Go to yast again and open "Partitioner". A warning will come up and you can click yes. On the Partitioner click on the left "Hard Disks" and then select the disk that you wanna use. In my case it is the "/dev/sdb". Click on the "Add Partition", select "Primary Partition" and click "Next".  On the next window select "Maximum Size" in order to use the entire disk and then click "Next". If you asked about the role of this partition then select "Operating System" and "Next".

In the last step it is important to select "Do not format partition" and "Do not mount partition" and then click "Finish". 

Ok so now we can go back to "iSCSI LIO Target" and click on the last tab "Targets" and then click "Add". Now most of the textboxes are filled by the system and you can modify them if needed but i will let them to default for now. This should look like the following picture but with different Target name, Identifier, and IP address.

Click in "Add" so we can add our first and only in that case LUN. If you wish to add more just repeat the following process. The LUN number in the following window should be already there and if this is your first LUN then it should be "0″. Now the Path needs to be the path to partition that we created before. In my case it is /dev/sdb1/. you can also add a name but if you let it empty the system will create one for you. Click "OK" and "Next" on the next window.

Now you should be on the following window.


Click the "Add" and provide the Initiator name that are going to connect to that target. Only the initiators with the identical name will be able to connect. We will use this name later on when we will try to connect that from another machine. This name has a specific syntax and it has to be like that:

iqn:yyyy-mm.reversed.domain.name[:identifier]  or something like that: eui:yyyy-mm.reversed.domain.name[:identifier] I ll use the following but you can modify that as you wish "iqn.2017-04.eu.allaboutlinux:my.first.iscsi"

click "OK"


Now you should be able to see the target in the target list ans you can click Finish. The export is created and the server is running!


Mount the target into another computer in the same network.

lets try now to connect this to another computer. I ll use again another OpenSuse computer and after opening yast this time i will select "iSCSI Initiator". The first tab "Service" appears and you can select if that will run automatic on system boot or manually under the "Service Start" section. Then you need to specify the "Initiator Name" that we defined before. 


Now you need to go to the 2nd tab "Connected Targets" and click on "Add". On the upcoming screen you need to type the IP address of the iSCSI target and click next.

Now you should be able to see the target and you have to click on connect.

On the upcoming window under the "Startup" select "automatic" and the initiator will connect to the target automatically when the server is coming up. Click next and you will be able to see that the target is now connected. Click on "Next" and "Finish". Now you you should be able to see the disk under the list of your disks in the "Partitioner". Go to yast once again and click on "Partitioner".

The disk is not yet formatted nor mounted so lets to that. Right click on the disk and select "Add Partition" --> "Primary Partition" --> "Maximum Size" so we can use the whole disk. --> "Operating System" --> select the file system you wish to use and the mount point.


avatar

DNS Server in Ubuntu / Debian

December 4, 2015 in Services

Local DNS Server in Ubuntu Debian

What is a DNS

DNS stands for Domain Name System and its a service that associates domain names with ip addresses. Let me try to explain this a bit more.Since you are reading this article it means that you have typed my domain name (www.allaboutlinux.eu) or you found that link on another website. but when you are typing www.allaboutlinux.eu, your computer is not really able to know where this website is hosted and of course  computers are only good with numbers. So your computer will ask the DNS server about a domain name and the DNS server will reply with an ip address. Then your computer will contact that ip and hopefully the server behind that ip will reply. Enough with that lets start with the setup of the DNS server.

What you will need:

bind9 will be used in this tutorial and this one is the most widely used DNS in the world. BIND stands for Berkeley Internet Name Domain and was initially a project of 4 graduate students at the Computer Research Group at the University of California, Berkeley. Lets say now now that i have my DNS server (the one that we create now) at 172.16.10.1, my sql server at "172.16.10.12″, my Apache server at "172.16.10.15″, my file server at "172.16.10.17″, my router at "172.16.10.254″ and my computer at 172.16.0.101 all of them are at /24. so my network is working but i have to remember all the ips in order to connect to each server. and as my company growth i will have more servers and more workstations and that is making things more complicated. it would be easier if I had a way to connect to my sql server by just providing the name and not the ip and that is exactly what we will do here. Open a terminal and type the following commands.

sudo apt-get update

sudo apt-get install bind9

Now we need to define a name for our local zone. I will name this one "allaboutlinux.local" but you can choose whatever you want. more zones are also possible. All files that you will need to configure are in "/etc/bind/". lets define the new zone. Open the /etc/bind/named.conf.default-zones

sudo gedit /etc/bind/named.conf.default-zones

and add the following lines at the end of the document:

avatar

Install Ubuntu in VMware the easy way

October 12, 2015 in Install Ubuntu desktop edition 11.04, O.S.

Install Ubuntu 15.04 in VMware the easy way

Go to official website of Ubuntu and download the dvd http://www.ubuntu.com/download/desktop

Then if you don’t have already installed VMware go to the official site and download it:  https://my.vmware.com/web/vmware/downloads

NOTE!!! VMware workstation Player is free for home use but not for commercial use!!! Please check the EULA of VMware for more information!

Now we can start the installation:

Open VMware workstation player and click on "Create a New Virtual Machine"

Vmware_create_new_VM

Chose the installation media. if you have burned Ubuntu in a DVD you can insert that to your DVD drive and choose the first option or if you have it as an "iso" file then choose the second option and locate the iso file.

Vmware_Installation_Media

avatar

Install Google Chrome in Debian 8

October 10, 2015 in software

Install Google Chrome in Linux Debian

chromeGo to official website of Google Chrome and click on the "Download now" button.
Select the "64 bit .deb (For Debian/Ubuntu)", read the agreement and if you agree click on "Accept and Install" to download the installation package. Save the file to the default location ~/Downloads/.
the filename should look like that: "google-chrome-stable_current_amd64.deb"
after that open a terminal go to Downloads directory and try to install the package.

cd ~/Downloads/

sudo dpkg -i google-chrome-stable_current_amd64.deb

if you get an error like: "Errors were encountered while processing: google-chrome-stable" it is because some dependencies are missing. To fix that enter the following command:

sudo apt-get -f install

Then you should be able to run the installation without problems:

sudo dpkg -i google-chrome-stable_current_amd64.deb

To run Google Chrome type in terminal "google-chrome" or click the icon in the menu.

avatar

Install Skype in Debian

October 10, 2015 in software

Install Skype in Linux Debian

Skype is a simply way to make voice or video calls or chat with your friends with IM (instant messages). Go to official site of skype (http://www.skype.com/en/) and click on "Download skype". Select Debian from the dropdown menu of distribution selection. Save the file in your Downloads directory. the file should be something like skype-debian_4.3.0.37-1_i386.deb where the "4.3.0.37-1_i386″ is the version of skype.

before we proceed with the installation if you are running a 64bit Debian we need to add 32bit compatibility in case that you dont have already.
open a terminal and type:

sudo dpkg --add-architecture i386

sudo apt-get update

sudo apt-get install lib32z1 lib32ncurses5

sudo apt-get update

Now move to Downloads and try to install the downloaded skype package:

cd ~/Downloads/

sudo dpkg -i skype-debian_4.3.0.37-1_i386.deb

At that point most likely the installation will fail due to some missing dependancies. to fix that issue the following command:

sudo apt-get -f install

Once that is finished then type again

sudo dpkg -i skype-debian_4.3.0.37-1_i386.deb

Now that all dependancies are there the installation will be able to finish normally.
In order to start skype either type in terminal "skype" or by clicking the skype icon in menu.

avatar

install latest Darktable in Debian 8

September 17, 2015 in software, Web Server

install Darktable in Debian 8

There is an easy way to install darktable in Debian by issuing the command "sudo apt-get install Darktable" but this one will install an old version of Darktable.
If you need the latest stable one then you need to follow those steps:
open a terminal and type:

sudo apt-get update

sudo apt-get build-dep darktable

sudo apt-get install libglew-dev libcanberra-gtk-module mesa-opencl-icd mesa-utils-extra

Now go to the official website http://www.darktable.org/ and download Darktable. you should get a file with a name like darktable-x.x.x.tar.xz where x is the version of Darktable.

go to Downloads directory and extract that file.

cd ~/Downloads/

tar xvf darktable-1.6.8.tar.xz

now go into darktable directory and start the build process by typing:

cd darktable

./build.sh

Then issue the following command to install it.